Visitors
Sabtu, 14 April 2012
Setelah anda berhasil setting squid.conf pada setting squid tahap 2 selanjutnya anda masuk ke winbox dan masukkan scrip mikrotik di bawah ini dan sesuaikan dengan topologi jaringan anda.
Ether1 = gateway ( mengarah pada modem speedy anda)
Ether2= local (untuk client anda)
Ether3= Squid ( mengarah pada cpu squid anda)
1. Ip Firewall Nat
0 ;;; PROXY HIT
chain=dstnat action=dst-nat to-addresses=192.168.11.11 to-ports=3128 protocol=tcp src-address=!192.168.11.11
src-address-list=LocalNet dst-address-list=!ProxyNet dst-port=80,8080,3128
connection-mark=http-conn
chain=dstnat action=dst-nat to-addresses=192.168.11.11 to-ports=3128 protocol=tcp src-address=!192.168.11.11
src-address-list=LocalNet dst-address-list=!ProxyNet dst-port=80,8080,3128
connection-mark=http-conn
1 ;;; Added by webbox
chain=srcnat action=masquerade out-interface=ether1-gateway
chain=srcnat action=masquerade out-interface=ether1-gateway
2 chain=dstnat action=dst-nat to-ports=53 protocol=udp dst-port=53
3 ;;; SSH
chain=dstnat action=dst-nat to-addresses=192.168.11.11 to-ports=22
protocol=tcp dst-address=IP INTERNET ANDA/IP PUBLIC dst-port=22,10000
chain=dstnat action=dst-nat to-addresses=192.168.11.11 to-ports=22
protocol=tcp dst-address=IP INTERNET ANDA/IP PUBLIC dst-port=22,10000

2. Mangle
/ip firewall mangle
add action=mark-packet chain=prerouting comment=PROXY-HIT disabled=no dscp=12 \
new-packet-mark=proxy-hit passthrough=no
add action=mark-connection chain=prerouting comment=HTTP-CONN disabled=no \
in-interface=ether2 new-connection-mark=http_conn passthrough=no \
protocol=tcp src-address=192.168.1.0/24
add action=mark-packet chain=prerouting connection-mark=http_conn disabled=no \
new-packet-mark=http_conn passthrough=no
add action=jump chain=prerouting comment=”DNS SERVICE” connection-state=new \
disabled=no jump-target=udp-services protocol=udp
add action=mark-connection chain=udp-services disabled=no dst-port=53 \
new-connection-mark=dns passthrough=no protocol=udp src-port=1024-65535
add action=mark-connection chain=udp-services disabled=no dst-port=123 \
new-connection-mark=ntp passthrough=no protocol=udp src-port=1024-65535
add action=mark-connection chain=forward comment=YM disabled=no dst-port=\
5050,5100 new-connection-mark=YM passthrough=no protocol=tcp
add action=mark-packet chain=forward connection-mark=YM disabled=no \
new-packet-mark=ym-conn passthrough=no
add action=mark-connection chain=prerouting comment=ICMP_KONEKSI disabled=no \
new-connection-mark=ICMP_KONEKSI passthrough=yes protocol=icmp
add action=mark-packet chain=prerouting connection-mark=ICMP_KONEKSI \
disabled=no new-packet-mark=ICMP_PAKET passthrough=no protocol=icmp
add action=change-mss chain=forward comment=”CHANGE MMS” disabled=no new-mss=\
1448 passthrough=yes protocol=tcp tcp-flags=syn tcp-mss=!0-1448

3.Queue type
/queue type
set default kind=pfifo name=default pfifo-limit=50
set ethernet-default kind=pfifo name=ethernet-default pfifo-limit=50
set wireless-default kind=sfq name=wireless-default sfq-allot=1514 sfq-perturb=\
5
set synchronous-default kind=red name=synchronous-default red-avg-packet=1000 \
red-burst=20 red-limit=60 red-max-threshold=50 red-min-threshold=10
set hotspot-default kind=sfq name=hotspot-default sfq-allot=1514 sfq-perturb=5
add kind=pcq name=downstream pcq-burst-rate=0 pcq-burst-threshold=0 \
pcq-burst-time=10s pcq-classifier=dst-address pcq-dst-address-mask=32 \
pcq-dst-address6-mask=128 pcq-limit=50 pcq-rate=0 pcq-src-address-mask=32 \
pcq-src-address6-mask=128 pcq-total-limit=20000
add kind=pcq name=upstream pcq-burst-rate=0 pcq-burst-threshold=0 \
pcq-burst-time=10s pcq-classifier=src-address pcq-dst-address-mask=32 \
pcq-dst-address6-mask=128 pcq-limit=50 pcq-rate=0 pcq-src-address-mask=32 \
pcq-src-address6-mask=128 pcq-total-limit=20000
set only-hardware-queue kind=none name=only-hardware-queue
set multi-queue-ethernet-default kind=mq-pfifo mq-pfifo-limit=50 name=\
multi-queue-ethernet-default
set default-small kind=pfifo name=default-small pfifo-limit=10

4.Queue Tree
/queue tree
add burst-limit=0 burst-threshold=0 burst-time=0s disabled=no limit-at=0 \
max-limit=0 name=”==KONDISI_PING==” packet-mark=ICMP_PAKET parent=\
global-total priority=1 queue=default
add burst-limit=0 burst-threshold=0 burst-time=0s disabled=no limit-at=0 \
max-limit=0 name=DOWN1 parent=ether2 priority=5
add burst-limit=0 burst-threshold=0 burst-time=0s disabled=no limit-at=0 \
max-limit=0 name=Downlink1 packet-mark=http_conn parent=DOWN1 priority=5 \
queue=downstream
add burst-limit=0 burst-threshold=0 burst-time=0s disabled=no limit-at=0 \
max-limit=0 name=HIT-1 packet-mark=proxy-hit parent=DOWN1 priority=5 queue=\
downstream
add burst-limit=0 burst-threshold=0 burst-time=0s disabled=no limit-at=0 \
max-limit=0 name=UPLOAD-1 parent=ether1 priority=5
add burst-limit=0 burst-threshold=0 burst-time=0s disabled=no limit-at=0 \
max-limit=0 name=Up-Ether1 packet-mark=proxy-hit parent=UPLOAD-1 priority=5 \
queue=upstream
add burst-limit=0 burst-threshold=0 burst-time=0s disabled=no limit-at=0 \
max-limit=0 name=Http-Proxy parent=ether3 priority=5
add burst-limit=0 burst-threshold=0 burst-time=0s disabled=no limit-at=0 \
max-limit=0 name=Proxy-Hit packet-mark=proxy-hit parent=Http-Proxy \
priority=5 queue=upstream
add burst-limit=0 burst-threshold=0 burst-time=0s disabled=no limit-at=0 \
max-limit=0 name=”==KONDISI_PING==” packet-mark=ICMP_PAKET parent=\
global-total priority=1 queue=default
add burst-limit=0 burst-threshold=0 burst-time=0s disabled=no limit-at=0 \
max-limit=0 name=DOWN1 parent=ether2 priority=5
add burst-limit=0 burst-threshold=0 burst-time=0s disabled=no limit-at=0 \
max-limit=0 name=Downlink1 packet-mark=http_conn parent=DOWN1 priority=5 \
queue=downstream
add burst-limit=0 burst-threshold=0 burst-time=0s disabled=no limit-at=0 \
max-limit=0 name=HIT-1 packet-mark=proxy-hit parent=DOWN1 priority=5 queue=\
downstream
add burst-limit=0 burst-threshold=0 burst-time=0s disabled=no limit-at=0 \
max-limit=0 name=UPLOAD-1 parent=ether1 priority=5
add burst-limit=0 burst-threshold=0 burst-time=0s disabled=no limit-at=0 \
max-limit=0 name=Up-Ether1 packet-mark=proxy-hit parent=UPLOAD-1 priority=5 \
queue=upstream
add burst-limit=0 burst-threshold=0 burst-time=0s disabled=no limit-at=0 \
max-limit=0 name=Http-Proxy parent=ether3 priority=5
add burst-limit=0 burst-threshold=0 burst-time=0s disabled=no limit-at=0 \
max-limit=0 name=Proxy-Hit packet-mark=proxy-hit parent=Http-Proxy \
priority=5 queue=upstream
5.Queue Interface
/queue interface
set ether1 queue=upstream
set ether2 queue=downstream
set ether3 queue=ethernet-default
set ether1 queue=upstream
set ether2 queue=downstream
set ether3 queue=ethernet-default

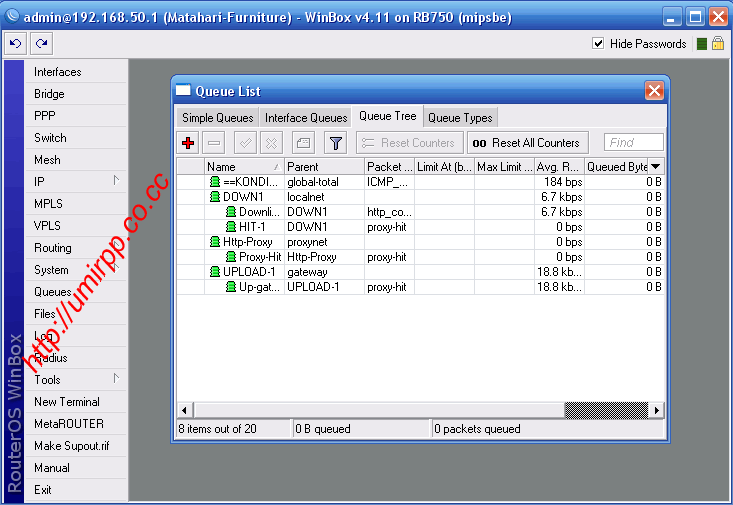
Sampai disini proxy anda sudah berjalan dengan baik, silahkan anda cek di interface,ip firewall nat, mangle jika datanya jalan berarti squid anda sudah berjalan.
Coba anda tes buka youtube atau game online. biarkan video dari youtube berjalan terus dan coba buka file yang sama tetapi pada computer lain, seharusnya video yang anda buka tidak terputus-putus dan game online tanpa harus loading dulu alias langsung play.
lihat gambar di bawah ini:

Jika anda kurang paham silahkan anda chat dengan kami atau add kami di facebook...........!!!!
Langganan:
Postingan (Atom)
About Me

- 45computer
- Aktivitas sehari-hari sebagai tukang service elektronik dan komputer